
Table Of Contents
Standard Tools Requirements
The installer is assumed to have a complete set of common installation tools including:- #2 Phillips screwdriver
- 5/32” Allen key
- 1/4” open wrench
- 1/4″ wrench
- Torque wrench 0 to 20 lbf.in (0 to 2 N.m), for 5/32” hex bit
Vehicle Requirements
Before installing the MDU-G4 system, verify the following items on the vehicle:- The vehicle’s steering system is in good working order. Drive the vehicle to verify this prior to beginning the installation. There should be no play in the steering and the vehicle should turn proportionally the same to the left and right.
- The vehicle’s electrical system and battery must be in good working order.
- The vehicle should be fully cleaned before installing the MDU-G4 system. A clean vehicle will improve the overall installation and cable routing
Vehicle Inspection
Before installing the MDU-G4 system, confirm that the vehicle and the vehicle’s steering system are in good working order by driving it around. In addition, verify the following items:- Verify that you can turn the steered wheels from lock to lock.
- Record the time it takes to turn the vehicle’s steering mechanism (ex. steering axle, articulation point) from full left to full right and then record the time to go from full right to full left as fast as you can manually. This will be used later to ensure steering performance is okay.
- Verify the vehicle steers straight and does not pull to one side when driving in a straight line.
- Verify that there are no oil leaks.
- Check for loose or worn steering components.
How to install an auto steer?
- Take an MDU – mechanical drive units. The installation of MDU takes a fixed part – Gear wheel, which needs to be installed under the steering system.
- Attached to the steering wheel.
- Tighten an anti rotation brackets. Once you made the installation, connect the MDU to it.
- Connect the cable
- Enjoy your ride as other clients:
Can you provide an auto steer installation service?
We provide installation service by partners in Germany, Belgium, Austria, the Netherlands and Ukraine. In other countries, service brings by local specialists with experience of installation auto steering systems by Claas, Mueller-Electronics, Ag Leader, TeeJet.Do I need to order additional cables?
We offer a full package for your autosteer/autosteer kit, so you do not need to order additional cables.Which time it takes to install the auto steer kit by my own?
Installation time depends on your tech level. It may take several hours. We highly recommend to go briefly through manual.How to connect L1/L2 receiver
The ECU-S1 requires the position information from an external RTK GNSS receiver. The receiver providing NMEA messages can be directly connected to the ECU-S1 over the RS-232 Serial interface.The minimum RTK GNSS receiver configuration requirements are as follows:- 38400 bps baud rate; 115200 is recommended;
- GGA NMEA messages at 10 Hz;
- VTG NMEA messages at 10 Hz;
- ZDA NMEA messages at 1 Hz;
- Position data resolution must have at least 6 decimal places; 8 places are recommended;
- RTK, DGPS, OmniSTAR™ or other correction mode improving position quality is highly recommended.
Figure 1-6 L1/L2 RTK GNSS receiver Connections
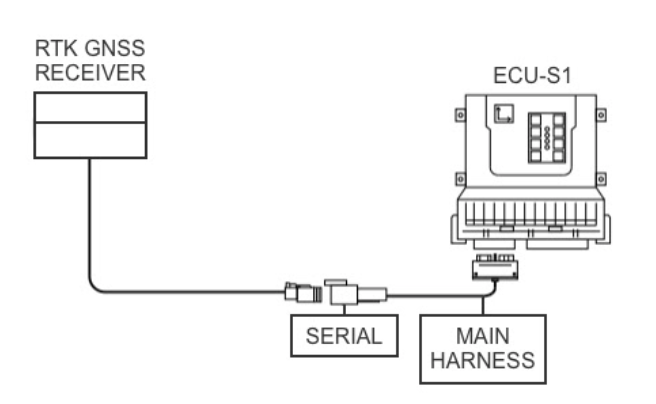 Figure 1-6 shows L1/L2 RTK GNSS receiver connection. Diagram shows the receiver connected directly to ECU-S1.
Contact us


Congratulations!
Your request has been successfully sent. Our representative will contact you shortly to clarify the details.